In this final installment on learning Git (part one is here, followed by part two and part three), we’re going to cover an important topic: Remote repositories, including GitHub. The whole idea behind Git is that each developer has their own repository on their own machine. Unlike older source control systems, there isn’t a central repository from which developers check out their files to work on.
However, by having their own repositories, the developers still need to merge the branches of their repositories together. Git was developed from the ground up for exactly that type of development process.
Although there’s technically no central repository, you can still have a repository that you treat as a central repository of sorts. That’s where something like GitHub comes in. On GitHub, you keep another repository with your code, and that’s the one that developers all merge their branches into.
However, it’s important to remember that, even with a repository on GitHub, you’re still dealing with individual repositories, and the one on GitHub is just another repo.
A typical scenario is that you’ll create a remote repository (such as on GitHub) and you’ll copy the repo down to your own computer. You’ll then work on a branch, and then copy that branch back up to the remote repo. The remote repo will integrate the branch, just as if it was created in that remote repo itself.
One interesting aspect here, however, is that you can work with existing branches. You can have a branch on both the remote repo and your own local repo; make changes and commit them to your local repo; and then push them up to the remote repo. Your commits will be added to the end of the branch on the remote repo so that the remote branch will be identical to your own branch. Essentially, the changes on your local branch get pushed up and merged into the branch on the remote repo.
Of course, this takes some coordination. If two people are working on the same file on the same branch, and one person pushes their changes up to the remote repo, and then you push your changes up to the same repo, there’s going to be a clash. Since you were second, the remote repo won’t let you overwrite the other developer’s changes. Instead you’ll get an error message.
Now let’s look at some real examples.
Cloning
In the spirit of the chicken and egg, you have to start a repo somewhere. Most developer shops will initialize a repo on GitHub from which everyone else will copy the repo to their own machines. The process of copying the repo is called cloning. Although I briefly mentioned cloning earlier in this series, I didn’t describe how it fit together with the ideas of remote repositories. Cloning is easy to do, provided you’re granted access to the repo on GitHub and you’ve set up your local ssh keys.
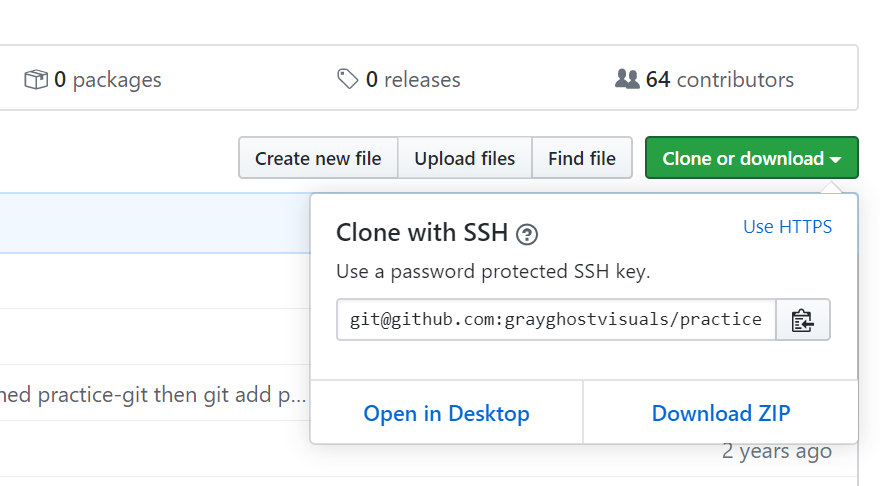
When you’re ready to clone, you simply go to the repo’s page on GitHub, click the “clone or download” button, make sure it says “Clone with SSH” (if it says “Clone with HTTPs,” click “Use SSH”), and copy the provided link.
On your own computer, in a directory where you want the new repo’s directory to be created, you type:
git clone git@github.com:username/reponame.gitThe last part of that string is the URL copied from the site. This will create a directory with a name matching the repo name, and then pull down the repository.
Pushing
As you do your work, you’ll do the usual things such as creating branches and checking your files into your branches. In many cases, you won’t do any merging locally. Instead, you’ll push your branches up to GitHub and merge inside it. Then you’ll copy the merged branches back down to your machine. The process of copying your branches up to GitHub is called pushing; the process of pulling those changes back down is called pulling.
In order to push a branch up to GitHub, you simply type:
git push origin mybranchReplace “mybranch” with the name of the branch you’re pushing to GitHub. As for the “origin” part, that’s just what Git by default refers to the remote repository by. You’re technically allowed to configure your local repo to use a different name to refer to the remote by, but most people don’t. Best to just stick with “origin.”
Once you’ve pushed a branch up to GitHub, the latter will update its own branch with your changes, adding your commits to the end of it. But then you’ll likely want to merge that branch (which might be a feature branch) into another branch (such as the main development branch).
Previously, we looked at doing this locally on your own machine. But to merge branches on GitHub, you have to create what’s called a Pull Request (or PR). Why Pull? Because although from your end you’ve pushed the branch to GitHub, from GitHub’s perspective, the branch was pulled from your computer. Go here to learn about GitHub and pull requests.
Pulling
After you’ve merged branches on GitHub, and after your teammates have merged branches on GitHub as well, you’ll need to pull those changes back to your computer. There’s a simple command to do that. Make sure you’re in the branch you want to pull and type:
git pullThis will pull down the branch and merge it into your own copy of the branch. Technically, Git pull is the combination of two commands, git fetch and git merge (read more about it here). The git fetch command is also pretty useful, which you can read about here.
Conclusion
If you’re enjoying Git, you can thank the Linux founder Linus Torvalds. He came up with the idea for it and built the very first version so that the Linux team would have an ideal source code control system. That was back in 2005—and now, 15 years later, it’s the most popular by far. So now is the best time to learn it!